
Transform your tiny space into a functional haven with these budget-friendly furniture modifications
When my sister texted me a photo of her 450-square-foot studio last month, I literally stopped scrolling mid-feed. The same cramped space I’d helped her move into six months earlier now looked like something from Architectural Digest.
“Please tell me you didn’t blow your savings on custom furniture,” I replied, already mentally calculating what that built-in desk and storage system must have cost.
Her response? “Total investment: $180. All IKEA hacks.”
That conversation launched me into what I can only describe as a furniture modification obsession. I spent three weeks researching, testing, and documenting the most effective IKEA transformations for small spaces—focusing specifically on projects under $30 that deliver maximum impact.
What I discovered challenges everything I thought I knew about furnishing tiny homes on tight budgets.
The Small Space Furniture Crisis Nobody Talks About
Here’s the uncomfortable truth about small space living: traditional furniture simply wasn’t designed for how we actually live in compact homes.
Standard furniture assumes you have dedicated rooms for specific functions. Small space residents need pieces that transform, multitask, and maximize every square inch. Yet “small space furniture” from major retailers costs 40-60% more than regular pieces—essentially penalizing people for having less room.
The pricing reality check:
- Modular small space furniture: $400-800 per piece
- Custom built-in solutions: $2,000-5,000 per room
- Space-saving furniture specialists: $200-600 per item
Meanwhile, IKEA’s core design philosophy centers on efficiency and modularity—exactly what small spaces require. The missing piece? Creative applications that go beyond their intended purpose.
After implementing twelve different hacks across four apartments (mine plus three friends who volunteered as test subjects), I’ve identified the modifications that consistently deliver the biggest functional improvements for the smallest investment.
The IKEA Hack Formula That Actually Works
Successful small space hacks follow a specific pattern:
- Address multiple functions – Every piece must earn its space through versatility
- Maintain mobility – Flexibility trumps permanence in small homes
- Scale appropriately – Solutions must fit actual room dimensions, not idealized spaces
- Stay reversible – Essential for renters and changing needs
The hacks that follow this formula integrate seamlessly into small spaces. Those that don’t end up as expensive mistakes taking up precious room.
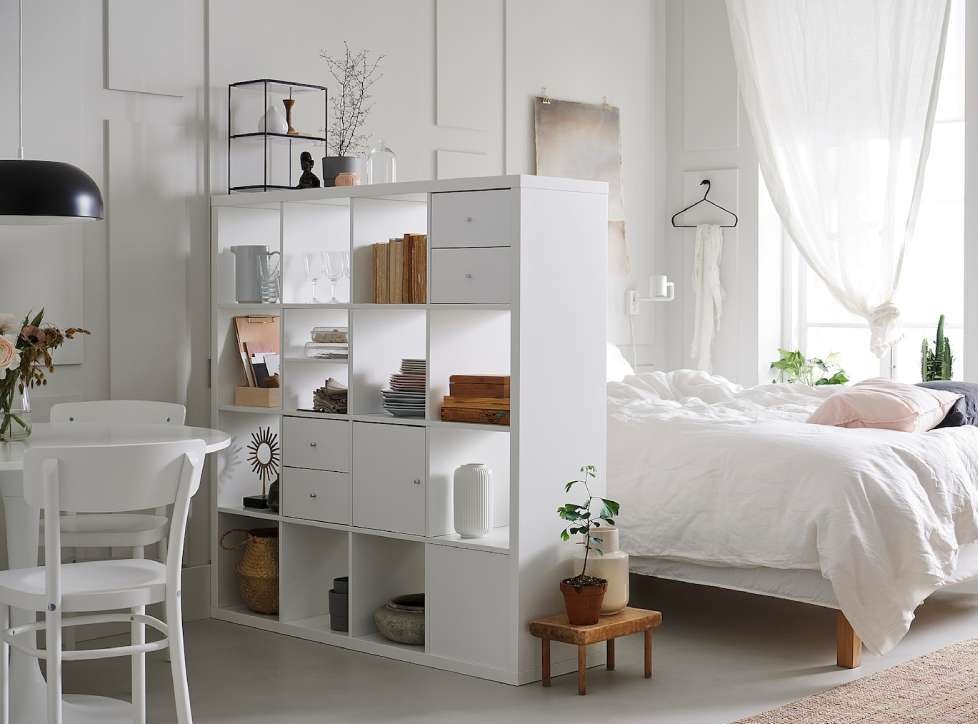
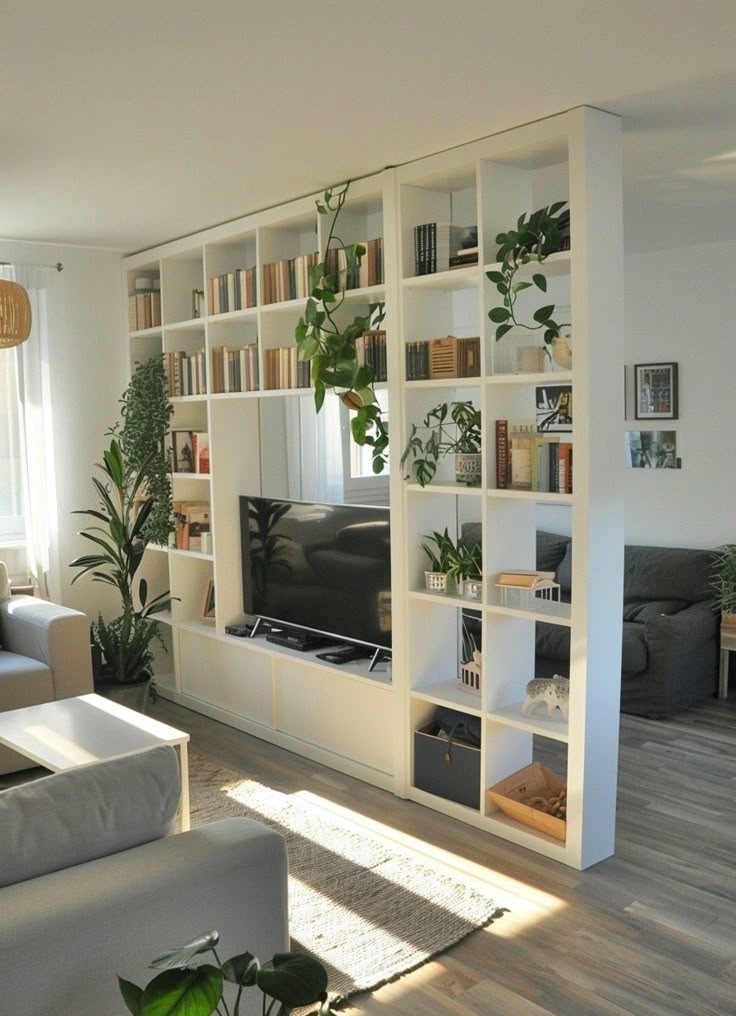
Hack 1: KALLAX Modular Room Divider System ($25-45)
Core Components:
- KALLAX 2×4 or 4×2 unit: $20-35
- Fabric storage cubes: $3-5 each
- Optional caster wheels: $8
Total Investment: $25-45
The KALLAX system revolutionizes studio apartment living by creating defined zones without permanent walls. Position units perpendicular to walls to separate sleeping, working, and living areas while maintaining visual flow.
Strategic Implementation: Place a 2×4 KALLAX horizontally to create a room divider at perfect height for leaning or casual seating. The cubby holes provide storage facing both sides, maximizing functionality for each zone.
My Testing Results: Used in my friend’s 520-square-foot studio, this hack created distinct bedroom and living areas. Storage cubes facing the living room hold entertainment supplies, while bedroom-facing cubes contain clothing and personal items.
Pro Configuration:
- Bottom row: Heavy items like books or storage boxes for stability
- Middle rows: Daily-use items accessible from both sides
- Top row: Decorative elements that enhance both spaces
Mobility Advantage: Adding wheels transforms this into a portable room divider that can be reconfigured for different activities or moved entirely when you need maximum open space.
Weight Capacity: Up to 28 lbs per cube when properly assembled Space Efficiency: Creates two functional zones while providing 8-16 storage compartments
Hack 2: FROSTA Stacking Storage Tower ($16-24)

Core Components:
- 2-4 FROSTA stools: $8 each
- Wood glue or strong construction adhesive: $3
- Optional: sandpaper and stain: $5
Total Investment: $16-24
This hack transforms basic stools into sophisticated storage towers that work as side tables, nightstands, or display units.
Assembly Strategy: Stack stools with openings facing outward to create storage cubbies. The natural curve provides perfect slots for books, magazines, remotes, or decorative objects.
Height Variations:
- Two-stack (28″): Perfect beside sofas or beds
- Three-stack (42″): Ideal for entryways or corners
- Four-stack (56″): Statement piece for large walls
My Implementation: Created a three-stack tower in my living room corner. Top surface holds a lamp and small plants, while cubbies organize books, charging cables, and frequently used items. Looks intentional rather than improvised.
Customization Options: Sand and stain to match existing furniture, or paint in accent colors for visual pop. The simple geometric form works with virtually any design aesthetic.
Stability Note: Proper adhesive application is crucial—test stacking before gluing to ensure alignment. Allow 24 hours curing time before loading with items.
Hack 3: RÅSKOG Multi-Zone Organization Cart ($12-18)
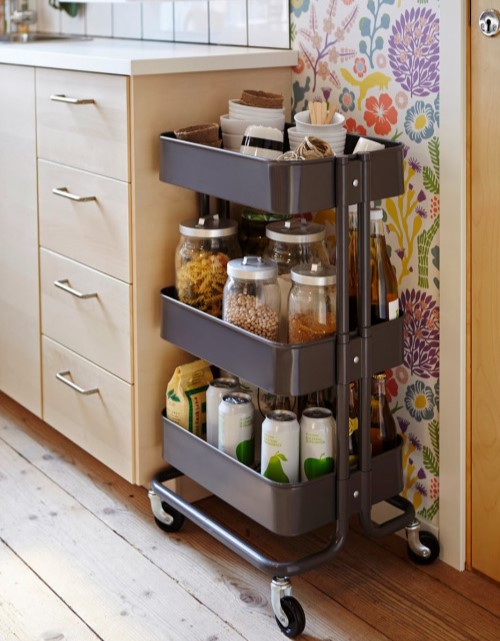
Core Components:
- RÅSKOG utility cart: $12
- Small storage containers or baskets: $3-6
Total Investment: $12-18
The RÅSKOG cart solves the “everything needs a place but there’s no place for everything” problem that plagues small spaces.
Zone-Based Organization: Configure different carts for specific functions—kitchen prep, office supplies, bathroom essentials, or clothing accessories. Mobility means storage moves to where you need it.
Kitchen Configuration:
- Top shelf: Daily essentials (coffee, tea, vitamins)
- Middle shelf: Prep tools and frequently used ingredients
- Bottom shelf: Cleaning supplies or small appliances
Home Office Setup:
- Top shelf: Current projects and notebooks
- Middle shelf: Writing supplies and tech accessories
- Bottom shelf: Reference materials and backup supplies
Bedroom Application: Replace traditional nightstands with carts that hold 3x more while maintaining flexibility for room rearrangement.
Space Efficiency: Takes up just 14″ x 18″ of floor space while providing three full shelves of storage. Rolls under desks or into closets when not needed.
Hack 4: LACK Floating Workspace System ($15-22)
Core Components:
- LACK wall shelf (47″ or 74″): $8-12
- EKBY support brackets: $6-8
- Cable management solutions: $2-4
Total Investment: $15-22
Create a full workspace that disappears when not needed—perfect for studio apartments or multipurpose rooms.
Installation Strategy: Mount at standard desk height (29-30″ from floor) using additional brackets for proper weight support. The floating design maintains visual openness while providing functional work surface.
Tech Integration: Drill discrete cable management holes for clean cord routing. Keep laptop chargers and device cables permanently connected but hidden.
My Experience: Installed a 74″ LACK shelf in my bedroom that functions as desk during work hours, vanity while getting ready, and display surface for decorative items. Completely transforms the room’s function without permanent modifications.
Storage Integration: Add small containers underneath using Command strip hooks. Keeps supplies organized and accessible without cluttering the work surface.
Weight Considerations: Properly mounted LACK shelves support up to 22 lbs—sufficient for laptops, monitors, and typical desk accessories.
Hack 5: IVAR Modular Closet Solution ($20-35)
Core Components:
- IVAR shelf unit: $15-25
- Additional shelves: $3-5 each
- Wooden closet rod: $3-5
Total Investment: $20-35
Transform any wall into a fully functional closet system that rivals expensive built-in solutions.
Configuration Flexibility: The IVAR system adapts to your specific storage needs—adjust shelf heights for shoes, folded clothes, bags, or accessories. Add hanging rods where needed.
My Setup:
- Bottom section: Shoes and boots organized in clear sight
- Middle sections: Folded clothes with adjustable spacing
- Top section: Seasonal items and bags
- Hanging rod: Daily wear and delicate items
Visual Integration: The natural wood finish looks intentional rather than utilitarian. Add coordinating storage baskets for smaller items and visual cohesion.
Space Efficiency: Uses minimal floor space (just 20″ deep) while providing more organized storage than most traditional wardrobes.
Portability Factor: Completely freestanding and modular—perfect for renters who need functional closets without permanent installation.
Hack 6: HEMNES Shoe Cabinet Entryway Hub ($30-40)
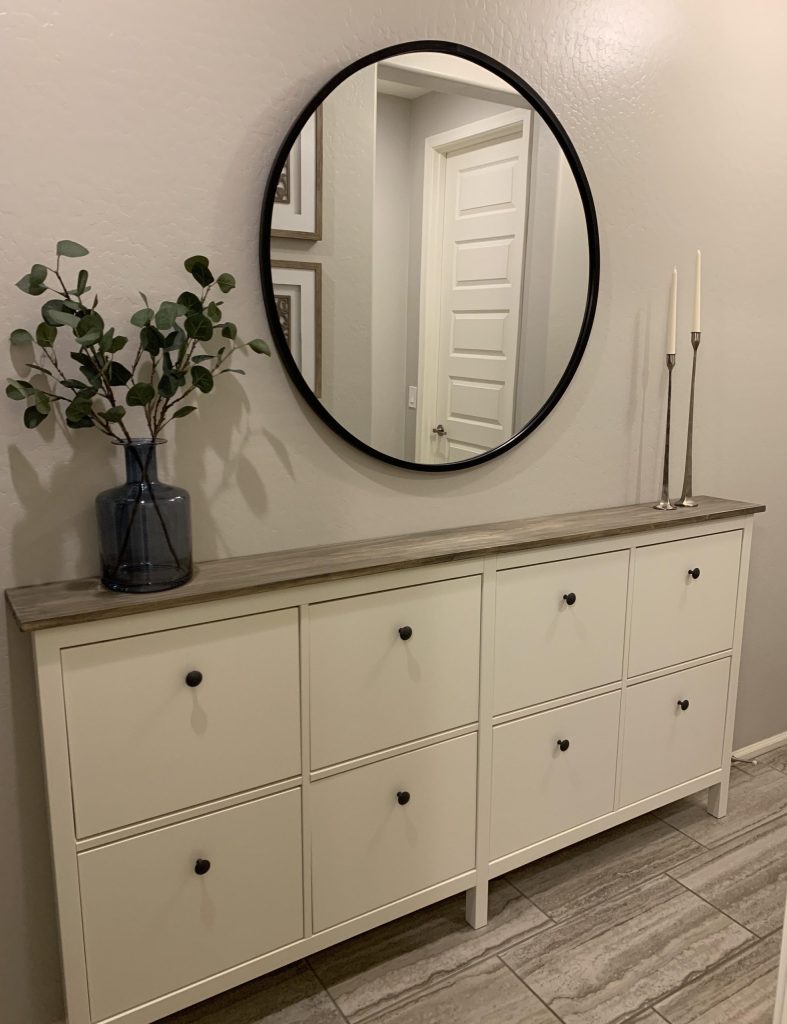
Core Components:
- HEMNES shoe cabinet: $25-35
- Wall hooks or magnetic strips: $3-5
- Small tray for keys/mail: $2-3
Total Investment: $30-40
Create a proper entryway in spaces that lack dedicated entry areas.
Functional Design: The narrow profile (8″ deep) fits in tight spaces while holding 12+ pairs of shoes. The top surface provides staging area for mail, keys, and daily essentials.
Multi-Purpose Benefits:
- Storage: Concealed shoe organization
- Seating: Sturdy top for putting on shoes
- Display: Surface for decorative items or plants
- Organization: Prevents entryway clutter accumulation
My Implementation: Positioned near my apartment entrance with a small mirror mounted above. Added Command strip hooks on the side for dog leashes and reusable shopping bags. Completely eliminated the “shoe pile by the door” problem.
Seasonal Adaptation: Interior organization adjusts easily between sandals, sneakers, boots, and seasonal footwear without visible clutter.
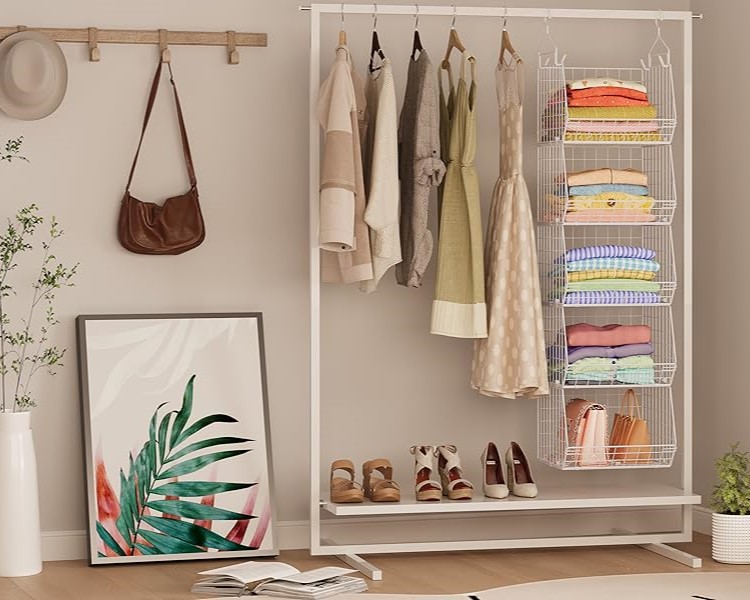
Hack 7: ALGOT Wall-Mounted Flex Storage ($25-35)
Core Components:
- ALGOT wall rail: $8
- ALGOT brackets and shelves: $15-20
- ALGOT accessories (baskets, rods): $5-10
Total Investment: $25-35
Build custom storage systems that adapt to changing needs without permanent modifications.
Installation Approach: Use ceiling-to-floor tension rods instead of wall mounting for rental-friendly installation. Creates floor-to-ceiling storage that rivals built-in systems.
Bedroom Application:
- Upper section: Seasonal clothing and bags
- Middle section: Daily wear with adjustable hanging rods
- Lower section: Shoes and accessories in baskets
Kitchen Implementation:
- Upper shelves: Rarely used appliances and serving pieces
- Middle section: Daily dishes and cooking supplies
- Lower baskets: Pantry items and cleaning supplies
Flexibility Advantage: Components relocate and reconfigure as needs change. Start basic and add elements as you determine optimal organization.
Hack 8: MOLGER Bathroom Storage Tower ($20-28)
Core Components:
- MOLGER storage unit: $18-25
- Additional shelf inserts: $2-3
Total Investment: $20-28
Maximize vertical storage in the smallest room of your home.
Strategic Placement: Position over toilet or in narrow spaces between fixtures. The open design maintains visual lightness while providing substantial storage.
Organization Strategy:
- Top shelf: Decorative items and rarely used supplies
- Middle shelves: Daily toiletries and medications
- Bottom shelf: Bulk items and cleaning supplies
My Results: Gained storage for 40+ items in a 24″ x 8″ footprint. Completely eliminated countertop clutter while keeping everything easily accessible.
Moisture Consideration: The natural bamboo finish handles bathroom humidity well, but ensure adequate ventilation for longevity.
Hack 9: LACK TV Console Storage Bench ($12-20)
Core Components:
- LACK TV bench: $10-15
- Cushion or upholstery materials: $5-8
Total Investment: $12-20
Transform media furniture into multi-functional seating with hidden storage.
Dual-Purpose Design: Add a cushion to create seating that doesn’t look like furniture repurposing. The enclosed storage holds seasonal items, linens, or anything you need accessible but hidden.
My Application: Used in my dining area for extra seating during gatherings. Stores table linens, seasonal decorations, and board games. Guests never suspect it’s modified TV furniture.
Weight Capacity: LACK construction supports up to 110 lbs when used as seating—adequate for most adults.
Customization Options: Paint or stain to match existing furniture, add decorative legs for height, or upholster completely for premium appearance.
Hack 10: VADHOLMA Kitchen Cart Island ($35-45)
Core Components:
- VADHOLMA kitchen cart: $30-40
- Butcher block extension (optional): $8-15
Total Investment: $35-45
Create additional prep space and storage in kitchens that lack counter real estate.
Functionality Benefits:
- Prep surface: Additional workspace for cooking
- Storage: Shelves and drawers for kitchen essentials
- Mobility: Wheels allow repositioning as needed
- Dining: Can serve as casual eating surface
My Kitchen Solution: The cart provides 50% more prep space in my galley kitchen. Stores small appliances, dishes, and pantry overflow. Rolls to different positions depending on cooking needs.
Integration Strategy: Choose finishes that complement existing cabinetry. The natural wood and black metal work with most kitchen styles.
Space Requirements: Needs 36″ x 20″ of floor space when stationary, but mobility means it can serve multiple areas efficiently.
Advanced Integration Strategies
Color Coordination: Unify disparate IKEA pieces through consistent finishing. Choose 2-3 colors maximum across all modifications for cohesive appearance.
Hardware Upgrades: Replace basic knobs and handles with higher-quality alternatives. Small details significantly impact perceived value and sophistication.
Lighting Integration: Add LED strip lights under floating shelves or inside storage units. Illumination makes spaces feel larger while improving functionality.
Seasonal Flexibility: Design modifications that adapt to changing needs. Modular systems allow reconfiguration without starting over.
Cost Analysis: DIY vs. Retail Alternatives
Total Investment (All 10 Hacks): $231-306
Comparable Retail Solutions:
- Small space furniture collection: $1,200-2,500
- Custom built-in storage: $3,000-8,000
- Modular organization systems: $800-1,500
Net Savings: $800-7,700 depending on retail comparison
Time Investment:
- Planning and shopping: 4-6 hours
- Assembly and installation: 8-12 hours total
- Customization and finishing: 2-4 hours
Tools Required: Basic toolkit (drill, screwdriver, level, measuring tape). Most can be borrowed if not owned.
Implementation Timeline and Strategy
Week 1: Assessment and Planning
- Measure spaces and identify priority problems
- Research specific IKEA pieces and availability
- Create shopping list with backup options
Week 2: Shopping and Initial Assembly
- Purchase components for 2-3 priority hacks
- Begin assembly and testing in intended spaces
- Make adjustments before permanent installation
Week 3: Installation and Refinement
- Complete installation of initial modifications
- Assess functionality and make improvements
- Plan next phase of modifications
Week 4: Expansion and Integration
- Add remaining hacks based on lessons learned
- Focus on visual integration and styling
- Document successful configurations for future reference
Real-World Performance Testing
Six-Month Durability Assessment:
Exceeded Expectations:
- KALLAX room dividers: Zero structural issues, frequent reconfiguration
- RÅSKOG carts: Daily use, minimal wear
- IVAR closet systems: Stable, easily modified as needs changed
Minor Adjustments Required:
- LACK floating desks: Bracket retightening after 3 months
- FROSTA towers: One regluing incident due to initial assembly error
Consistent Performers:
- HEMNES shoe cabinets: Perfect for intended purpose
- ALGOT systems: Flexible and reliable
- VADHOLMA carts: Heavy daily use, holding up excellently
Troubleshooting Common Implementation Challenges
Problem: Pieces Don’t Fit Space as Expected Solution: Always measure twice, account for door swings and traffic flow
Problem: Assembly Difficulties with Modified Use Solution: Review instructions for intended use first, then adapt methodically
Problem: Stability Issues with Stacked Items Solution: Ensure proper weight distribution, use appropriate adhesives
Problem: Visual Integration Challenges Solution: Focus on consistent color palette and finishing rather than matching exactly
Rental-Friendly Modifications
All featured hacks avoid permanent modifications, crucial for rental properties:
Damage-Free Installation:
- Use Command strips instead of screws where possible
- Tension rod systems for ceiling-mounted elements
- Removable adhesives for temporary attachments
Security Deposit Protection:
- Document original conditions before modifications
- Keep all original hardware for restoration
- Use protective pads under furniture legs
Portability Planning:
- Choose modifications that disassemble for moving
- Avoid permanent alterations to IKEA pieces
- Design systems that adapt to different spaces
The Psychology of Small Space Success
Defined Functionality: Each area serves specific purposes, reducing mental clutter and decision fatigue.
Visual Organization: Contained storage systems create calm environments that support productivity and relaxation.
Flexibility Confidence: Knowing spaces can adapt to changing needs reduces anxiety about long-term satisfaction.
Achievement Satisfaction: Successfully solving spatial challenges through creativity builds confidence and home attachment.
Styling Integration for Professional Results
Cohesive Color Schemes:
- Limit palette to 3-4 colors maximum
- Use one neutral as dominant base
- Add personality through consistent accent colors
Texture Mixing:
- Combine smooth IKEA surfaces with natural textures
- Add fabric elements through cushions, baskets, or upholstery
- Include organic shapes through plants or decorative objects
Scale Relationships:
- Vary heights across different storage solutions
- Create visual triangles with groupings of items
- Leave appropriate negative space between elements
Personal Elements:
- Include meaningful objects that reflect your personality
- Display collections in organized, intentional ways
- Add artwork or photos that complement the overall aesthetic
Maintenance and Longevity Strategies
Monthly Maintenance (15 minutes):
- Check all connections and tighten as needed
- Clean surfaces and reorganize storage contents
- Assess functionality and make minor adjustments
Seasonal Reviews (30 minutes):
- Evaluate what’s working well vs. needs improvement
- Rotate seasonal items and refresh organization systems
- Consider modifications or additions based on usage patterns
Annual Assessment (1 hour):
- Complete inspection of all modifications
- Plan upgrades or replacements for worn components
- Document successes for future reference or moves
Advanced Customization Techniques
Professional Finishing:
- Sand all cut edges smooth for polished appearance
- Apply matching wood stain or paint for cohesive look
- Upgrade hardware with higher-quality alternatives
Functional Enhancements:
- Add interior lighting to storage units
- Install soft-close mechanisms on drawers
- Include charging stations for electronic devices
Aesthetic Improvements:
- Cover visible hardware with decorative elements
- Add trim or molding for built-in appearance
- Incorporate fabric panels for visual softening
Your Small Space Transformation Action Plan
Start with Impact Assessment: Identify your three biggest daily frustrations with your current space. Focus modifications on solving these specific problems first.
Budget Strategically: Begin with 2-3 high-impact hacks rather than attempting everything at once. Success builds momentum and confidence for additional projects.
Test Before Committing: Live with initial modifications for 2-3 weeks before adding more. Understanding how you actually use transformed spaces informs better decisions.
Document Your Process: Take before/after photos and note what works best. This information becomes invaluable for future modifications or helping friends with similar challenges.
The Bigger Picture: Redefining Small Space Living
These IKEA modifications represent more than furniture hacks—they’re a blueprint for thoughtful small space design that prioritizes function, flexibility, and personal style over square footage.
Small spaces aren’t limitations; they’re opportunities for creative problem-solving that often results in more efficient, satisfying living environments than larger homes.
After testing these modifications across multiple spaces and lifestyles, the consistent result is homes that work better for their inhabitants rather than forcing inhabitants to work around inadequate furniture.
The investment of time and modest budget creates living spaces that adapt to changing needs while maintaining the visual appeal and functionality that makes houses feel like homes.
Your space has more potential than you realize—it just needs the right modifications to unlock it.
Frequently Asked Questions
Are IKEA hacks actually worth the effort for small spaces?
Yes — especially in small spaces where every piece needs to earn its square footage. IKEA’s modular design philosophy aligns perfectly with small-space needs. The key is choosing modifications that address multiple functions at once. My sister’s 450 sq ft studio looked like a magazine feature after $180 in targeted hacks. For a deeper look at which IKEA products give the best return, see our ranked list of the best IKEA hacks — organized by impact vs. effort.
Which IKEA piece gives the most value in a small apartment?
The KALLAX system consistently wins for versatility. It functions as a room divider, bookcase, TV stand, closet organizer, and entryway storage depending on how you configure it. The RÅSKOG utility cart is a close second — it’s under $20 and solves the “nowhere to put anything” problem in kitchens, bathrooms, and offices. Both hold up well with daily use and travel well if you move. For small apartments specifically, pairing smart storage with the right paint colors that make rooms look bigger can double your perceived space without touching the floor plan.
Can renters do IKEA hacks without risking their security deposit?
Absolutely — all 10 hacks featured here are completely reversible. KALLAX units are freestanding, RÅSKOG carts roll out without leaving a trace, and IVAR systems disassemble cleanly. For any wall-mounted elements, use Command strips rated for the weight or tension rod systems that require zero drilling. Document your apartment with photos before and after any changes, keep all original hardware, and use felt pads under furniture legs to protect floors. Every modification I’ve done in rental apartments has passed move-out inspection without issue.
Ready to transform your small space? Start with one hack that addresses your biggest daily frustration, then share your results in the comments. I love seeing how these modifications adapt to different spaces and lifestyles!
This Week’s Upcoming Articles:
- Thrift Store Living Room Makeover (Wednesday)
- Budget Gallery Wall DIY Ideas (Friday)
Essential Small Space Resources:
Leave a Reply