
I ignored my dining room for almost two years.
The table was fine. The chairs were mismatched and kind of wobbly. The overhead light cast this flat, yellow glow that made everything look slightly depressing. The walls were completely bare. Every time I sat down to eat, I thought I should do something about this room — and then I didn’t, because I assumed it would cost more than I had.
It didn’t. I transformed the whole space for $195, and I’m going to show you exactly how — every item, every store, every dollar.
This guide covers the full dining room transformation: furniture, lighting, walls, and decor. There’s also a renter-friendly version at the end with every swap that requires zero drilling or permanent changes.
Why the Dining Room Always Gets Ignored
Living rooms get the Pinterest treatment. Bedrooms get the aesthetic overhaul. But dining rooms? Most people treat them like a passthrough.
That’s actually good news for us. Because dining rooms are used every single day — meals, homework, work calls, board games — and the impact of fixing this one room is massive. It’s also one of the most underserved rooms in the budget decor world, which means you’re not fighting a sea of identical listicles to find advice that works.
Here’s what I set out to do: a full dining room transformation for under $200, using a combination of thrift store finds, IKEA pieces, Dollar Tree decor, and a few hours of DIY on a Saturday afternoon.
What I Started With (Before)
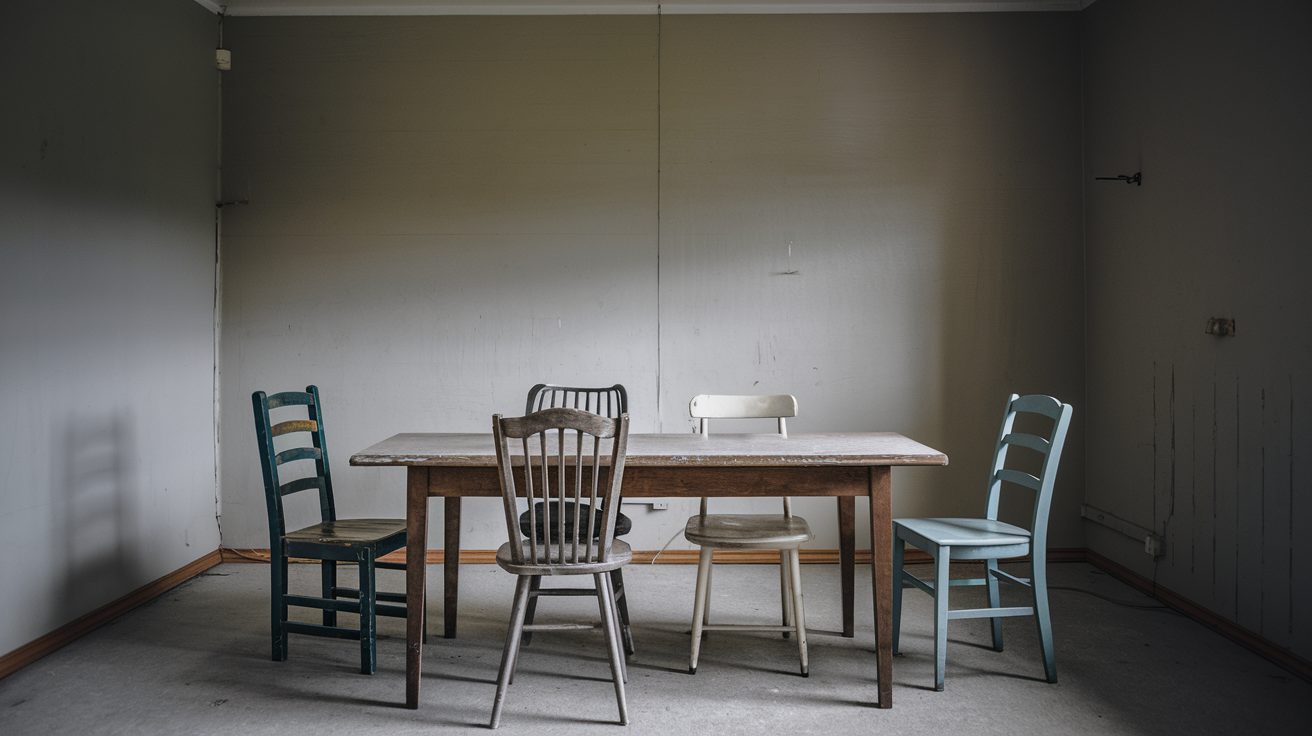
Here’s my honest before: a scratched laminate table from a previous apartment, four chairs in three different styles, a builder-grade overhead light fixture, and zero wall decor. The vibe was “furniture that came with the apartment” even though I’d been living there for two years.
Budget renter constraints applied too — I couldn’t paint the walls, couldn’t swap the built-in light fixture without landlord approval, and didn’t want to put too many holes in the drywall.
Total I’d spent on this room before the makeover: $0 intentionally. Everything was inherited, hand-me-down, or came with the place.
Step 1 — Set Your Budget and Priorities
Before buying anything, I sat down and made a priority list based on one question: what has the highest visual impact per dollar?
The $200 Budget Breakdown (Overview)
| Category | Budget Allocation |
|---|---|
| Furniture (table + chairs) | $80 |
| Lighting | $40 |
| Wall decor (gallery wall) | $20 |
| Table decor (centerpiece, runner, placemats) | $35 |
| DIY materials | $25 |
| Total | $200 |
Pick a 3-Color Palette Before You Buy Anything
This is the step most budget makeover guides skip and it’s why rooms end up looking like a collection of random nice things instead of a cohesive space.
Pick three colors max: one neutral (white, cream, warm grey), one mid-tone (sage, terracotta, navy, warm oak), one accent (brass, black, or a soft pop color). Every item you buy should fit one of these three. My palette: cream + warm oak + soft sage. That’s why the spray-painted white chairs, the oak-toned table, and the sage cushion covers work together — not because I got lucky, but because I decided first.
If you’re not sure where to start, pull the color from one item you already own and love — a rug, a piece of art, a throw — and build the three-color palette around it. The thrift store decorating guide has a good breakdown of how to do this with secondhand finds.
What to Splurge On vs. What to Skip
Spend more on lighting. Swapping a light fixture — or even just adding a plug-in pendant — is the single fastest way to make a dining room feel intentional. Bad overhead lighting ruins everything else you do.
Don’t buy a new table. A scratched or dated dining table is almost always fixable with chalk paint and new hardware. Or find one for $20–$40 on Facebook Marketplace with good bones.
DIY the walls. A gallery wall costs $15–$25 and looks like you spent $200. It’s the highest-ROI project in this whole makeover.
Step 2 — The Dining Table: Thrift It, Flip It, or IKEA It
Thrift Store and Facebook Marketplace Finds
This is where I’d always start. A solid wood dining table at Goodwill, Habitat for Humanity ReStore, or Facebook Marketplace runs $20–$60 — and most of the ones that look “ugly” just need some chalk paint and new hardware.
What to look for: solid construction, no wobble, and fixable surface damage (scratches, water stains, peeling veneer). Avoid anything with structural damage to the legs or frame.
My table came from Facebook Marketplace for $35. It was a beat-up oak table with deep scratches. I sanded it lightly, applied two coats of Annie Sloan chalk paint in French Linen (about $10 worth from a local paint shop that sells small quantities), and waxed it. Total cost: $45. It looks like a farmhouse decor table from a styled home now.
Renter note: All of this is fully portable. You’re painting furniture you own, not modifying the apartment.
IKEA Options Under $100
If you’re starting from nothing and don’t want to hunt thrift stores, IKEA is your friend. The DANDERYD table starts around $80 and the LISABO is similarly priced — both are clean, minimal, and pair well with mismatched chairs. Add four STEFAN chairs and you have a complete dining set for around $160.
That’s your whole furniture budget and it looks intentional.
Furniture Arrangement: Get This Right Before You Decorate
Before painting a single chair or buying a single frame, check your furniture placement. The most common dining room mistake: table pushed against the wall or shoved into a corner to “save space.” It doesn’t save space — it just makes the room look smaller and harder to use.
The table should float in the room with at least 36 inches of clearance on all sides so chairs can be pulled out comfortably. If your room is too small for that, consider a drop-leaf table or a round table — both take up significantly less visual and physical space than a rectangle.
What If You’re Keeping Your Current Table?
- Tablecloth from Walmart: $8–$15 and it covers everything. Pick a neutral linen-look fabric.
- Table runner: More styled than a tablecloth, works better on a nicer surface. Target has good ones for $12.
- Leg wrap (peel-and-stick wood contact paper): Transforms laminate legs for about $8. Fully removable — ideal for rentals.
Step 3 — Chairs: The Fastest Way to Change the Whole Room
My four mismatched chairs came from three different sources: two from a previous apartment, one from a Goodwill haul, one from Facebook Marketplace at $8.
The trick with mismatched chairs: paint them all the same color.
It transforms “random furniture” into “intentional eclectic.” I used Rust-Oleum 2X spray paint in Satin White — two cans at $7 each, used about 1.5 cans total. That’s $10.50 to unify four completely different chairs.
After painting, I added seat cushion covers from Amazon — a 4-pack for about $28. They’re a soft sage green that ties into the centerpiece colors.
Total for chairs: $8 (Marketplace find) + $10.50 (spray paint) + $28 (cushion covers) = $46.50
Step 4 — Lighting: The Biggest Bang for Your Budget Buck
Plug-In Pendant Lights: The Renter Game-Changer
A plug-in pendant light hangs like a real pendant fixture but uses a standard outlet — no electrician, no landlord conversation. The cord runs along the ceiling (use removable adhesive clips to keep it tidy) and plugs into a wall outlet.
Mine came from Amazon for $38. Combined with a warm-toned Edison bulb (about $4), it completely changed the ambiance of the room.
Dimmer plug tip: A plug-in dimmer (~$12 on Amazon) works with almost any plug-in lamp or pendant.
How High to Hang Your Pendant
The standard rule: hang a pendant 30–36 inches above the tabletop for a dining table. Start at 34 inches — it works for almost every ceiling height and table combination.
Step 5 — The Rug: The Anchor Most People Skip
A dining room without a rug feels unfinished. The rule: your rug needs to be large enough that all four chair legs sit on it when the chairs are pulled out. Minimum 5×8 feet, ideally 8×10.
Budget options that actually work:
- IKEA STOENSE or HAMPEN: $40–$80 depending on size. Low pile, easy to clean.
- Ruggable washable rugs: $90–$150 for a 5×7 — machine washable, worth it for kids/pets.
- Amazon basics flat-weave rugs: 5×8 for about $45–$60.
- Facebook Marketplace / Goodwill: 8×10 for $20–$40 is normal.
I found mine on Facebook Marketplace: a neutral cream flat-weave 6×9 for $25.
Step 6 — Walls: A DIY Gallery Wall for Under $20
| Item | Source | Cost |
|---|---|---|
| 4 black frames (4×6) | Dollar Tree | $5.00 |
| 2 white frames (5×7) | Thrift store | $2.50 |
| 6 prints (printed at CVS) | Free Canva designs | $1.80 |
| Command strips (20-pack) | Walmart | $6.00 |
| Gallery wall total | $15.30 |
- Download 6 free botanical or abstract prints from Canva
- Print at CVS at the cheapest size that fits your frames ($0.29–$0.39 each)
- Lay your frames out on the floor and arrange them until you like the grouping
- Trace each frame on paper, cut it out, and tape to the wall to preview layout
- Hang using Command picture-hanging strips — no drilling required, fully removable
Renter note: Command strips hold up to 16 lbs per pair (per 3M’s product specs). Fully removable.
Step 7 — The Table Setting: Cheap Decor That Looks Expensive
Centerpiece Ideas Under $15
My setup: a thrifted glass vase ($2 at Goodwill) + IKEA SMYCKA faux eucalyptus stems (3 stems at $1.99 each = $6) + a few sprigs of real grocery store greenery ($3). Total: $11.
- Dollar Tree candle cluster: 3 pillar candles on a small tray, $6–$8 total.
- Seasonal stems in a mason jar: Rotate cheaply as seasons change.
Placemats, Napkins, and Table Runner
- Placemats: Walmart fabric placemats, 4 for $10
- Napkins: Dollar Tree linen-look napkins, set of 4 for $1.25
- Table runner: Target, neutral linen, $11
Small Dining Room Storage (Bonus Step for Tight Spaces)
The cheapest, most renter-friendly option: a narrow console or sideboard along one wall — $20–$50 at thrift stores or Facebook Marketplace. The organization and storage guide covers more small-space storage ideas.
The Complete Cost Breakdown
| Item | Source | Cost |
|---|---|---|
| Dining table (thrift flip) | Facebook Marketplace + chalk paint | $45.00 |
| 4 chairs (spray painted) | Facebook Marketplace + Rust-Oleum | $18.50 |
| Seat cushion covers (x4) | Amazon | $28.00 |
| Plug-in pendant light | Amazon | $38.00 |
| Edison bulb | Amazon | $4.00 |
| Gallery wall frames (6) | Dollar Tree + thrift store | $7.50 |
| Gallery wall prints | CVS + free Canva | $1.80 |
| Command strips | Walmart | $6.00 |
| Centerpiece (vase + faux stems + greenery) | Goodwill + IKEA + grocery | $11.00 |
| Table runner | Target | $11.00 |
| Placemats (x4) | Walmart | $10.00 |
| Napkins | Dollar Tree | $1.25 |
| TOTAL | $182.05 |
I came in $17.95 under budget. That’s real, not rounded.
Before and After — The Full Transformation
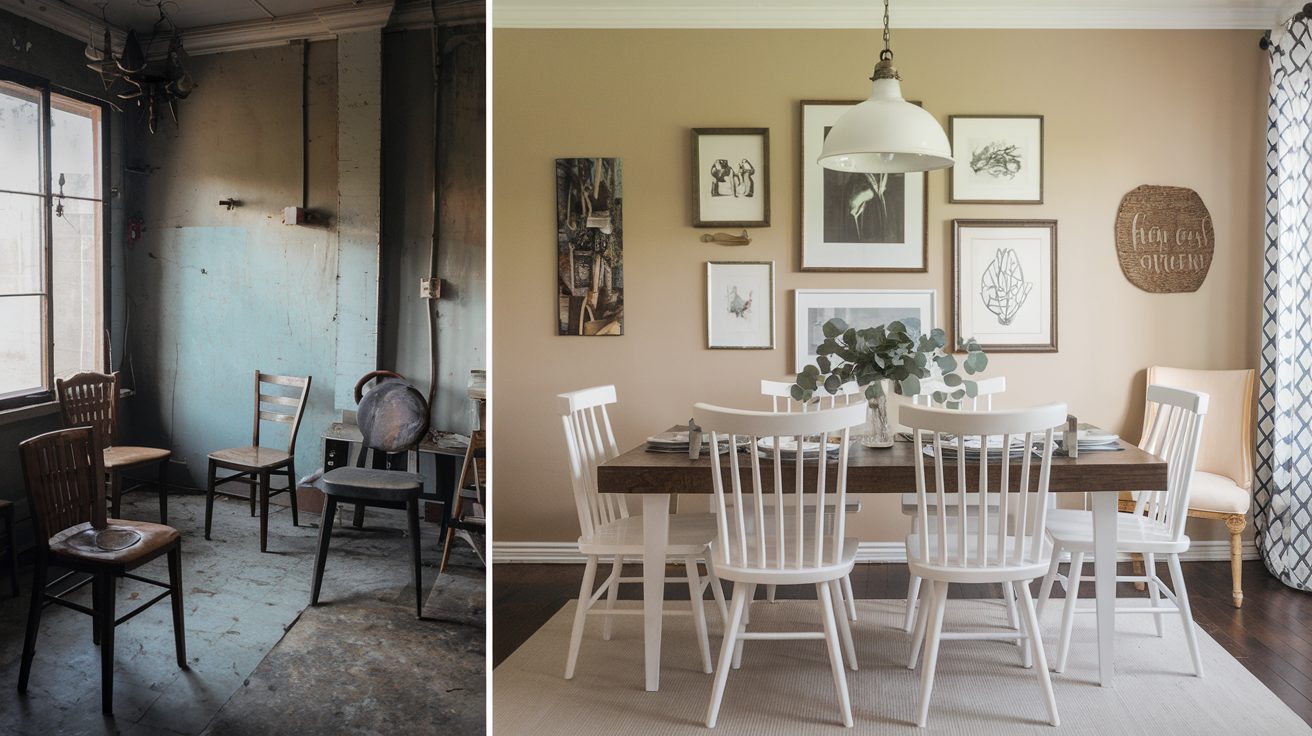
What changed most visually:
- The lighting — the plug-in pendant made the biggest single difference
- The gallery wall — the bare wall was the most depressing part of the before
- The chairs — unified with paint and cushion covers, they look like a set now
Renter-Friendly Version (No Damage, No Drilling)
- ✅ Table: Chalk paint on furniture you own — not modifying the apartment
- ✅ Chairs: Spray paint + cushion covers — portable, no permanent changes
- ✅ Lighting: Plug-in pendant light — no electrical work
- ✅ Gallery wall: Command picture-hanging strips — fully removable
- ✅ Rug: 100% renter-friendly — nothing attached
- ✅ Table decor: Placemats, runners, centerpiece — nothing permanent
- ✅ Table surface: Contact paper or tablecloth if needed
What to Tackle Next
If you’re ready to keep going room by room, the bedroom makeover guide covers the same approach for a $100 bedroom transformation. Or if you’re specifically looking for furniture flip ideas, the DIY furniture upcycling guide goes deeper on chalk paint and spray paint techniques.
Total spent: $182.05 | Time: approximately 6 hours across two days | Difficulty: beginner-friendly
Leave a Reply