Last Updated: March 2026
The best studio apartment layout separates your sleeping, living, and working zones using furniture placement and visual boundaries — no walls required. After living in a 480 sq ft studio myself and helping dozens of friends rethink their spaces, I’ve found that the configuration you choose makes or breaks how a studio actually feels to live in day-to-day.
Most studios in the US range from 400–600 square feet. That’s not a lot — but it’s more than enough if you approach the layout strategically. Here are 10 configurations that genuinely work, organized from simplest to most creative.
Table of Contents
- Why Layout Matters More Than Décor
- 1. The Classic Parallel Layout
- 2. The Sofa Room Divider
- 3. The L-Shaped Zone Layout
- 4. The Corner Bed Maximizer
- 5. The Murphy Bed Flex Space
- 6. The Bookshelf Boundary Method
- 7. The Diagonal Anchor
- 8. The Sleeping Loft (High Ceiling Studios)
- 9. The Open Plan Flow
- 10. The Hybrid Zone System
- How to Choose the Right Layout for You
- Common Layout Mistakes to Avoid
- FAQ
Why Layout Matters More Than Décor
Here’s the thing — you can have beautiful furniture and perfect lighting, but if your layout is off, the space will still feel chaotic. Layout is the foundation everything else rests on.
The core challenge in a studio is creating psychological separation between zones without physical walls. When your bed is visible from your couch, and your desk is three feet from your kitchen, your brain never fully relaxes or focuses. Good layout solves this.
Before moving a single piece of furniture, measure your space and draw a rough floor plan. Know your square footage, the location of windows and outlets, and any awkward architectural features (radiators, weird alcoves, support columns). That intel guides everything.
1. The Classic Parallel Layout
Best for: Long, narrow studios under 450 sq ft
This is the most straightforward configuration: kitchen and storage line one wall, and your living/sleeping area runs parallel along the opposite wall. Everything flows in a single axis.
I tried this in my first studio (a 380 sq ft space in 2022) and it worked surprisingly well. The key is keeping the central floor area completely clear — even 5 feet of open walkway makes the whole apartment feel bigger. Use a runner rug to define the center channel rather than filling it with furniture.
Pro tip: In a parallel layout, your sofa should face away from the bed. Even that small visual break tells your brain these are separate spaces.
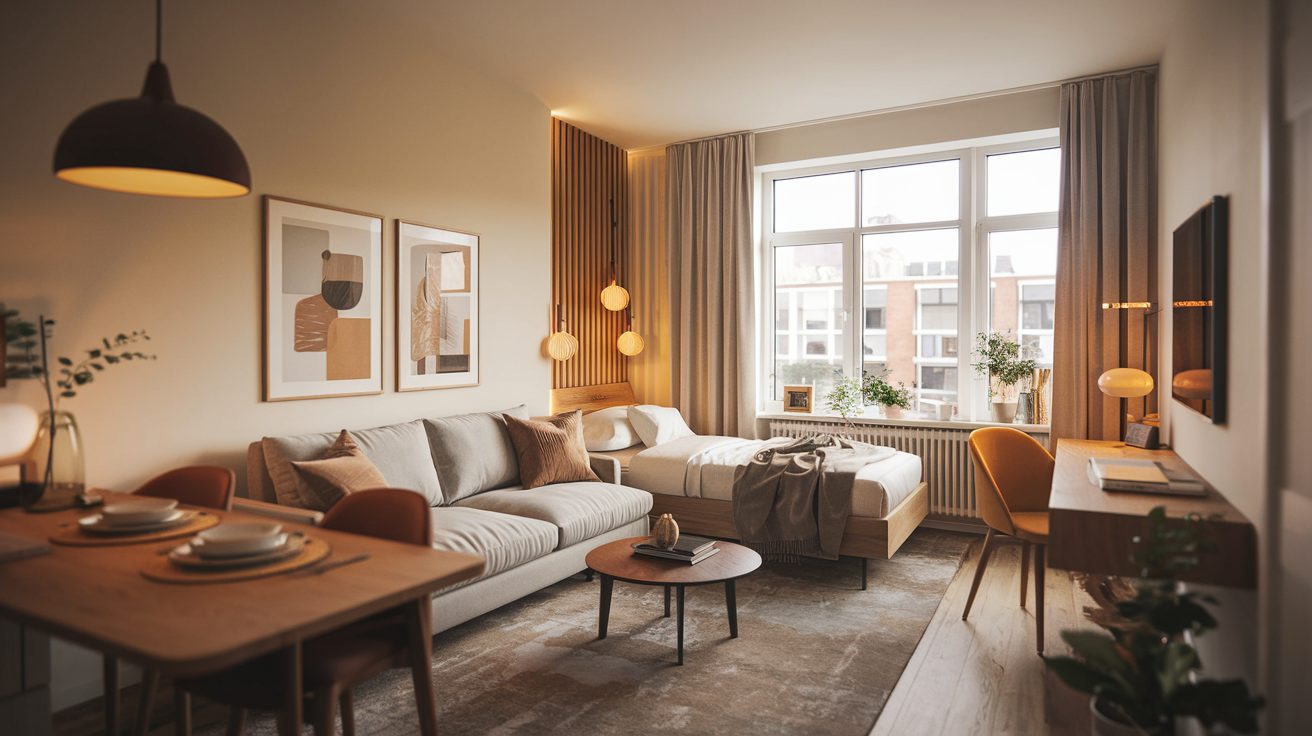
2. The Sofa Room Divider
Best for: Square studios, 450–600 sq ft
Float your sofa in the middle of the room with its back facing the bed area. This single move creates two distinct zones — a living area in front of the sofa, and a sleeping area behind it — without using any walls or dividers.
This is honestly my favorite configuration. It’s simple, affordable, and incredibly effective. Add a low console table behind the sofa (I used a $45 IKEA LACK shelf) to reinforce the visual barrier and give you a surface for lamps or plants.
What makes it work: The sofa back doesn’t need to be tall — even a standard 30–33 inch sofa back creates enough visual separation. Pair it with different lighting zones (floor lamp for the living area, bedside lamp for the sleeping area) and the zoning feels complete.
3. The L-Shaped Zone Layout
Best for: Studios with an open corner or alcove
Arrange your furniture in an L-configuration, with the living area occupying one leg of the L and the sleeping or work area tucked into the other. L-shaped layouts are especially powerful in studios that aren’t perfectly square — they work with the room’s natural shape rather than fighting it.
Interior designer Leanne Ford frequently advocates for this approach, noting that “furniture should follow the architecture, not ignore it.” If your studio has a natural nook or a slightly recessed corner, put your bed there and let the living area open up.
If you have an L-shaped sectional, let it define the two zones. The corner of the sectional points toward the center of the room, visually anchoring the living zone while opening both ends of the space.
4. The Corner Bed Maximizer
Best for: Studios under 400 sq ft where floor space is critical
Push your bed into a corner — ideally the corner farthest from the entrance — and access it from two sides rather than three. This frees up significant floor space compared to a centered or one-wall bed placement.
A twin or full works best here; a queen can feel too crowded against two walls unless your studio is wider than 14 feet. Use the wall space above the bed for mounted shelving or a floating headboard shelf to add storage without eating floor space.
Real cost breakdown: A mounted bedside shelf from IKEA (LACK wall shelf) runs about $15–$20. A simple platform bed frame with storage drawers underneath — perfect for corner placement — starts around $200–$280 at IKEA or Wayfair.
5. The Murphy Bed Flex Space
Best for: Studios that double as home offices or need maximum daytime space
A wall bed (Murphy bed) folds up during the day, converting your sleeping area into a full living or working space. If you work from home and your studio is also your office, this configuration is a game-changer.
Modern Murphy bed kits from IKEA (using the BRIMNES or KALLAX system as a base) can be assembled for $400–$800 total, significantly less than custom built-ins. Purpose-built Murphy bed units from brands like Wayfair run $800–$1,500.
The real advantage: by day you have a 100% functional living/work space. By night, pull down the bed and your sleep space feels completely separate from where you spent the workday — a key factor for both productivity and sleep quality.
6. The Bookshelf Boundary Method
Best for: Studios where you want visual separation without blocking light
Use open bookshelves (not solid walls) as room dividers. An IKEA KALLAX (4×2 or 4×4 unit) positioned perpendicular to the main living area creates a boundary while allowing light to flow through. Style the shelves from both sides and you have built-in storage and a visual divider in one.
I made a $12 IKEA KALLAX look custom with $8 worth of contact paper — it’s still holding up two years later. The trick is to not overfill it: leave some open cubbies for light and visual breath.
A KALLAX 4×2 unit runs about $90–$110. Combined with cube bins and styling accessories, you’re looking at $150–$200 total for a functional, attractive room divider.
7. The Diagonal Anchor
Best for: Boxy studios that feel monotonous
Angle your main piece of furniture — usually the bed or the sofa — at 45 degrees to the walls. This sounds chaotic but it’s genuinely one of the most effective ways to make a boxy room feel dynamic and larger.
The diagonal line creates visual movement and breaks the monotony of parallel walls. It also opens up a triangular floor space in the corner that you can use for a floor lamp, plant, or small accent table — spaces that are often dead zones in a standard layout.
Start with your bed: angle it 45 degrees in the corner of your sleeping zone. The headboard tucks into the corner, and the sides of the bed angle out into the room. Add a rug that aligns with the bed’s angle to complete the effect.
8. The Sleeping Loft (High Ceiling Studios)
Best for: Studios with ceilings 9 feet or higher
If your studio has high ceilings, a loft bed or mezzanine-style sleeping platform moves your bed up and off the floor entirely, freeing the entire floor plan for living and working. This is the most dramatic transformation possible in a studio.
Freestanding loft bed frames that fit a full or queen mattress start around $350–$500 online. If you’re handy, a DIY loft platform using 4×4 posts and plywood can be built for $150–$250 in materials. Under the loft, you gain a full zone for a desk, sofa, or even a closet setup.
Ceiling clearance rule: You need at least 3.5 feet between the top of your mattress and the ceiling to sit up comfortably in bed. For a 10-inch mattress on a platform, that means a minimum 9-foot ceiling for comfort, 10+ for true ease of movement.
9. The Open Plan Flow
Best for: Studios 500+ sq ft where you want a spacious feel
Instead of dividing zones, lean into the openness. Use a cohesive color palette, a single large area rug to anchor the living area, and consistent lighting throughout to make the space feel intentionally open-plan rather than cramped and undefined.
The key to making open plan work in a studio is visual consistency. Every piece of furniture should feel like it belongs to the same family — similar wood tones, a unified color story, no jarring contrasts. When everything reads as one cohesive space, openness feels luxurious rather than exposed.
For paint, stick to one color throughout — including the ceiling — in a light neutral. Benjamin Moore White Dove (OC-17) or Sherwin-Williams Accessible Beige (SW 7036) work beautifully for this seamless open feel. Check out our guide to best paint colors for small rooms for specific recommendations.
10. The Hybrid Zone System
Best for: Studios with 3+ functional needs (sleep + work + living)
This is the most intentional configuration and the one I’d recommend for anyone who works from home and needs clear mental boundaries between spaces. Designate three distinct zones — a work zone, a living zone, and a sleep zone — and use a combination of the above techniques to reinforce each one.
Here’s how I’d set it up in a 500 sq ft studio:
- Sleep zone: Corner bed (Configuration 4) with blackout curtains on a tension rod creating a soft enclosure
- Work zone: Desk against the wall with a bookshelf boundary (Configuration 6) separating it from the living area
- Living zone: Sofa floating in the center facing away from the bed, anchored by a rug
Three zones, three lighting schemes (desk lamp, floor lamp, warm bedside lamp), three distinct area rug territories if your square footage allows. This level of intention is what separates a studio that feels livable from one that feels like you’re camping in your own apartment.
How to Choose the Right Layout for Your Studio
Ask yourself these three questions:
| Question | If Yes → Consider |
|---|---|
| Do you work from home daily? | Murphy Bed (5) or Hybrid Zone (10) |
| Is your studio under 400 sq ft? | Corner Bed (4) or Parallel (1) |
| Do you have ceilings above 9 ft? | Sleeping Loft (8) |
| Is the room boxy and monotonous? | Diagonal Anchor (7) |
| Do you want maximum daytime openness? | Murphy Bed (5) or Open Plan (9) |
| Is light flow important to you? | Bookshelf Boundary (6) or Sofa Divider (2) |
Once you choose a configuration, test it with paper cutouts or a free app like RoomSketcher before moving furniture. Moving a bed twice is exhausting. Ten minutes of planning saves hours of frustration.
Common Studio Layout Mistakes to Avoid
Pushing everything against the walls. This is the most common studio mistake and it actually makes spaces feel smaller. Floating furniture — even just 6 inches off the wall — creates breathing room and makes the layout feel intentional.
Using furniture that’s too large. A king bed in a 400 sq ft studio leaves almost no floor space. A full (double) is usually the sweet spot — it sleeps comfortably and leaves room to live. Similarly, a 90-inch sectional in a 500 sq ft studio will dominate the space; a 72–80 inch sofa is usually the better call.
Ignoring the entry experience. The first 4 feet you see when you walk in sets the tone for the whole space. Don’t put your bed as the first thing visible from the front door. Position your living zone as the “greeting” area and keep the sleeping zone tucked away.
No rug = no zones. Without rugs to define areas, a studio looks and feels like one undifferentiated room. A rug under the sofa and coffee table creates a living zone; a smaller rug beside the bed creates a sleeping zone. This single investment does more for layout than almost anything else.
For more on making your studio feel spacious, read our full guide to how to make any room look bigger — many of those tricks apply directly to studio layouts. And if you’re decorating on a tight budget, our complete 2026 budget home decorating guide walks through priorities from start to finish.
For renter-specific ideas that work in any studio configuration, renter-friendly upgrades apply many of these same principles throughout the apartment. And for small-space organization that complements your layout, the reading nook guide for small apartments shows how to carve out functional sub-zones within existing configurations.
Frequently Asked Questions
What’s the best studio apartment layout for a work-from-home setup?
The Murphy Bed Flex Space (Configuration 5) or the Hybrid Zone System (Configuration 10) work best for remote workers. The Murphy bed gives you a dedicated workspace during the day that converts to a bedroom at night. The Hybrid Zone System creates clear physical boundaries between your work, living, and sleep areas — critical for mental separation when you work from home.
How do you separate a sleeping area in a studio apartment without walls?
The most effective methods are: (1) float your sofa with its back facing the bed, creating a visual boundary; (2) use an open bookshelf like IKEA KALLAX as a room divider; (3) hang curtains on a ceiling-mounted track around the bed area; (4) use different rugs, lighting, and paint accent colors to signal zone changes. None of these require walls or permanent modifications.
Should you push furniture against the walls in a studio apartment?
No — this is one of the most common studio mistakes. Pushing all furniture flush against walls makes a space feel smaller, not larger. Floating furniture 6–18 inches off walls creates breathing room and makes layouts feel purposeful. The exception is in studios under 350 sq ft where floor space is critical for walkability.
What size bed is best for a studio apartment?
A full (double) bed at 54×75 inches is usually the sweet spot for studios under 500 sq ft — it sleeps comfortably and leaves enough floor space for a functional living area. A queen (60×80 inches) works well in studios 500 sq ft and above. A king bed is generally too large for most studio layouts and will dominate the entire space.
How do you make a studio apartment feel like it has separate rooms?
Use three tools together: physical boundaries (sofa backs, bookshelves, curtains), distinct lighting zones (a different lamp for each area), and separate area rugs for each zone. When your living area has its own rug and floor lamp, and your sleeping area has its own rug and bedside lamp, the brain reads them as separate rooms even without walls. Consistent use of these three tools is more effective than any single design hack.
What furniture should every studio apartment have?
Prioritize: (1) a bed with under-bed storage drawers; (2) a sofa that can act as a zone divider; (3) a coffee table with storage (lift-top or shelved); (4) at minimum one open bookshelf for zone division and storage; (5) at least two distinct area rugs; (6) multi-functional pieces like a storage ottoman and a console table. Every piece should do double duty in a studio.
The right studio layout isn’t about having more space — it’s about using the space you have with intention. Start with one configuration, live in it for a week, and adjust. Most great studio setups evolve through iteration, not perfection on the first try. You don’t need a bigger apartment. You just need a smarter floor plan.
Leave a Reply